Years 7-11
MCAS/Bromcom student support
This is the student support page for My Child at School (MCAS). As well as the help and advice here, you will also receive support from staff at school.
Bromcom is the school's MIS (management information system) and is the central piece of software in the day to day running of the school. The ‘Student Portal’ is the name of the student view of our published data on both desktop and the app.
Using the Student Portal, you will have easy access to your data anytime and anywhere. A dedicated smartphone app provides the added convenience of allowing access on iPhones and Android.
Some of the things you will be able to access from the start:
- Your timetable
- Your detentions
- Your homework
- Your timetabled interventions
- Your behaviour record
- Your exam timetable and results
We have not enabled all the features in My Child at School yet, so there may be features mentioned in help guides that you find online that are not visible in your MCAS. We will publish help guides for all new features and visible data when we enable them.
Essentials
To get set up on Student Portal, every student must follow the first set of instructions below called 'How do I Sign in for the First Time?'
How do I sign in for the first time?
A. Your Bromcom account is linked to your OSA email. We are using 'Single Sign On' for Bromcom, so after you have carried out the steps below you won't need to enter your details each time.
You will need your phone for this and be able to receive school emails on that phone. The following instructions contain guidance for setting up the Outlook app in order to receive school emails. If you have an email app already set up to get school emails you don't need to install Outlook.
- Download the Student Portal app from the links below or search in your app store for the Bromcom Student app.
- Your phone must allow you to see your school emails too. If you haven't set up an email app to see your school emails already, then we recommend you use the Outlook app. Click below to see how to download and set up Outlook on your phone.
- Now open the Bromcom Student Portal app and select Login with... Magic Link
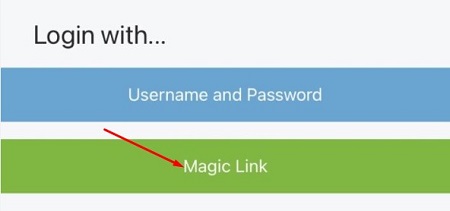
- Then enter the School ID 14835 and your school email. It's important that you enter your school email correctly.
-
Once done, you will see a message that the magic link has been sent to your school email.
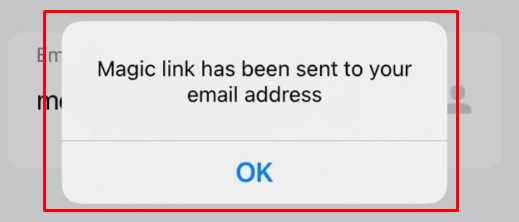
Reminder: Students MUST open the Magic Link Email from a DEDICATED EMAIL APP on the Mobile Phone/Device that the Student Portal App is also installed on.
Below is an example of how this email will look.
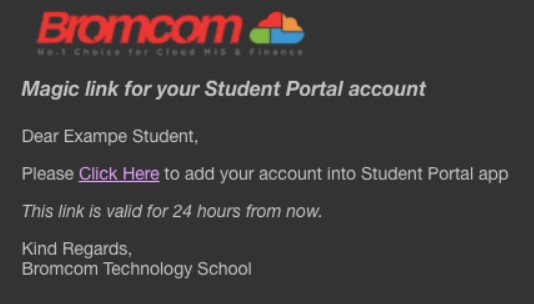
5. On your phone, click the link in the email, and it will automatically take you into the Student Portal app. If not, press the back button and try the link again.
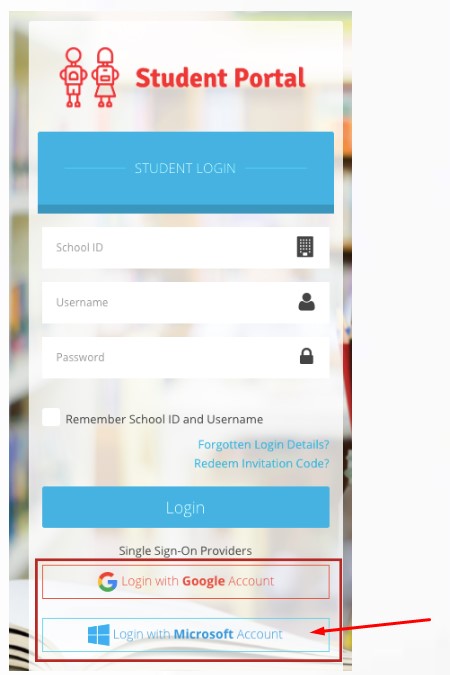
Doing these steps will enable you to use Single Sign for the Student Portal and bypass the need to enter your details every time in the future. From now on, when you log in to the Student Portal either via the Web or App Version, the App will take you straight through after you enter your 5-digit code or use Face/Touch Recognition while the Web Version will take you straight through after you select Login with Microsoft Account as seen below;
I have forgotten my pin what do I do?
A. Click the 'Forgotten my pin' link underneath where you enter your pin. Then follow the instructions Bromcom gives you to reset the app on your phone. This will be the same steps for setting up the app the first time, so you will need to be able to receive school emails on your device. See the instructions above for more information.
How is the student portal web page different from the app?
A. Yes, you can log into the Student Portal web here:
Sign in using the 'Login with Microsoft Account' button, then your school email and IT password.
It looks a little different to the apps because it is made for desktop viewing, but essentially it shows the same information as the app.
Please note that detentions are only visible on the web view currently, not the app.
How do I use the student portal web page
A. The Student Portal is easy to use and consists of 2 parts. This will refer to the web version but the process is the same on the app.
1. The main dashboard of coloured squares is where you can see information automatically at a glance.
The 'More' button in each coloured square takes you to a page that shows you a bit more information.
2. There is a menu along the left-hand side that allows you to see a bit more information about each area (the same information that the 'more button' takes you to).
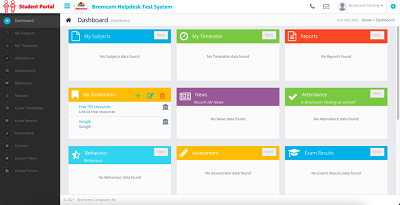
Further information on using the Student Portal is available in the video linked below. Note, we have not enabled all the features shown in the video but you will learn the basics of how to navigate around the Portal by watching it.
Video on how to use the Student Portal.
See the sections below for specific help.
Homework
You may find the extra space and presentation of homework in the web view preferable to the app.
You don't submit work using Bromcom. Complete and hand in the work as you normally do, whether that's in class or on another platform (Teams, Sparx etc).
If you need to remove a piece of homework from your list ahead of its due date - because you've finished it - then you can 'hide' the homework. Your hidden homework is available to view using the 'Show hidden homework' selector (web view).
![]()
Past homework will appear when you select 'Show Past Homework' (web view).
![]()
Exam Timetables
When finalised, the GCSE and A Level exam timetables, as well as timetables for some mocks, will be available on Bromcom.
Click on the menu link: Exam Timetables to view the latest timetable information.

All the columns can be sorted in alphabetical or numerical order by clicking the arrows in the column heading.
